To create a custom dialog in Windows Presentation Foundation you really just need to create a Window, place the required controls in it and then show it. In Solution Explorer, you can create a new window by right-clicking the name of the project, selecting Add, New Item… and Window (WPF).
Dialogs are modal subwindows. A modal window is a blocking operation that requires user response before the program can return to the parent window. Common dialogs are built-in dialogs that perform common operations such as opening and saving files, browsing folders, choosing colors or fonts and printing. This post is about custom dialogs. It’s a bad idea to write a custom dialog when there is a common dialog for the task.
Custom dialogs are discussed in Adam Nathan’s book WPF 4.5 Unleashed by Sams on pages 189 – 191 in chapter 7 (Structuring and Deploying Appliations).
Use Case
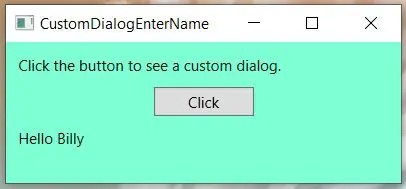
When would you want to create your own custom dialog? One reason might be to allow the user of the application to select a new skin. You could just ask the user to select a skin from a combo box, but if you want to show sample controls you will need more room and a customer dialog would do the job. For this post we’ll just cover the basics. The example in this post is very simple, but it does allow the user to enter some text in a modal window that we display later in the main program. We therefore can pass the user’s text or choice back. Below is the main program window.

Below is the modal dialog box that appears after you click the button.

After the user enters their name and clicks the OK button they will see the following.
Below is the XAML code of the main program window. There’s nothing that interesting here other than the Click event and it’s code. Also note that the TextBlock requires a Name property so that we can display the user’s text from the dialog.
<Window x:Class="CustomDialogEnterName.MainWindow"
        xmlns="http://schemas.microsoft.com/winfx/2006/xaml/presentation"
        xmlns:x="http://schemas.microsoft.com/winfx/2006/xaml"
        xmlns:d="http://schemas.microsoft.com/expression/blend/2008"
        xmlns:mc="http://schemas.openxmlformats.org/markup-compatibility/2006"
        xmlns:local="clr-namespace:CustomDialogEnterName"
        mc:Ignorable="d"
        WindowStartupLocation="CenterScreen"
        Title="CustomDialogEnterName" Height="150" Width="330">
    <Grid Background="Aquamarine">
        <StackPanel>
            <TextBlock Margin="10">Click the button to see a custom dialog.</TextBlock>
            <Button Name="btn" Width="80" Height="23" Click="Btn_Click">Click</Button>
            <TextBlock Margin="10" Name="answer"></TextBlock>
        </StackPanel>
    </Grid>
</Window>
Below is the code-behind of the main program window. When the user clicks the button on the main program we instantiate (create) a dialog based on Window1. The ShowDialog() method shows the dialog and waits for a response. If the user clicks Ok, the dialog returns true and the code inside the if statement is executed. It displays the user’s response on the main program window. I accepted the default name, Window1, when I created the dialog window, but its a better idea to give it a more descriptive name.
using System.Windows;
namespace CustomDialogEnterName
{
    public partial class MainWindow : Window
    {
        public MainWindow()
        {
            InitializeComponent();
        }
        private void Btn_Click(object sender, RoutedEventArgs e)
        {
            Window1 dialog = new Window1();
            if (dialog.ShowDialog() == true){
                // show it on main program
                answer.Text = "Hello " + dialog.txtAnswer.Text;
            };
        }
    }
}
Below is the XAML of the modal dialog window that asks the user for their name.
<Window x:Class="CustomDialogEnterName.Window1"
        xmlns="http://schemas.microsoft.com/winfx/2006/xaml/presentation"
        xmlns:x="http://schemas.microsoft.com/winfx/2006/xaml"
        xmlns:d="http://schemas.microsoft.com/expression/blend/2008"
        xmlns:mc="http://schemas.openxmlformats.org/markup-compatibility/2006"
        xmlns:local="clr-namespace:CustomDialogEnterName"
        SizeToContent="WidthAndHeight"
        mc:Ignorable="d"
        WindowStartupLocation="CenterScreen"
        Title="Window1" >
    <Grid Margin="10">
        <Grid.ColumnDefinitions>
            <ColumnDefinition Width="Auto" />
            <ColumnDefinition Width="*" />
        </Grid.ColumnDefinitions>
        <Grid.RowDefinitions>
            <RowDefinition Height="Auto" />
            <RowDefinition Height="Auto" />
            <RowDefinition Height="Auto" />
        </Grid.RowDefinitions>

        <Label Name="lblQuestion" Grid.Column="1">Enter Your Name:</Label>
        <TextBox Name="txtAnswer" Grid.Column="1" Grid.Row="1" MinWidth="150">Answer</TextBox>

        <WrapPanel Grid.Row="2" Grid.ColumnSpan="2" HorizontalAlignment="Right" Margin="0,15,0,0">
            <Button IsDefault="True" Name="btnDialogOk" Click="BtnDialogOk_Click"  MinWidth="60" Margin="0,0,10,0">_Ok</Button>
            <Button IsCancel="True" MinWidth="60">_Cancel</Button>
        </WrapPanel>
    </Grid>
</Window>
Below is the code-behind of the modal dialog box.
using System.Windows;
namespace CustomDialogEnterName
{
    public partial class Window1 : Window
    {
        public Window1()
        {
            InitializeComponent();
        }
        private void BtnDialogOk_Click(object sender, RoutedEventArgs e)
        {
            this.DialogResult = true;
        }
    }
}