There is a really good YouTube video that introduces you to Figma. It’s fairly detailed as it’s 18 and a half minutes but is great for beginners. It’s called Figma 101: An introduction tutorial that’s by Charli Marie.
Figma is a design tool for creating user interface designs for your projects, such as a website, mobile app, or tablet app. It is available for Windows and Mac and it is online and is considered to be software as a service (SaaS). Figma also has a downloadable version that works with the online version. You can have either a free or paid account. I would recommend starting with a free account. It’s enough to get you going. Why? With a free account, you can up to 3 projects, which is like a folder. The good news is that you can have many files in a project. So, its a bit confusing but a file can represent an actual user interface endeavor because within a file you can have multiple pages. All your website design work containing all of the web pages can exist in a single Figma file, where the file contains at least 3 pages. In the video, Charli’s 3 pages are: initial wireframe, design work, and to be built. This is in the video.
Getting Started on a New Project
Here are some steps to getting started after you have had a look at Figma and created your first team and project. In the video at time 2:34 Charli Marie starts with creating a file. She goes through some of her initial steps.
File Creation and Setup
- Create a new file for your new client ABC Inc.
- Rename the file to ABC Inc.
- Move the file to a project, if you wish, or just leave it in Drafts.
- Add a frame. A frame is a specific size.
- Add a grid to the frame.
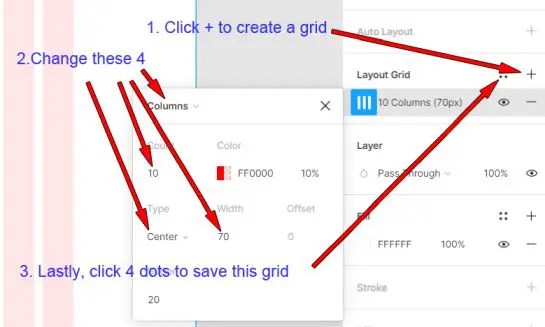
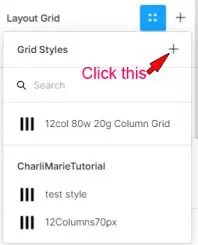
After you click the 4 dots in the above diagram, you should see something like the following in the diagram below. Go ahead and click the plus to save the grid style.
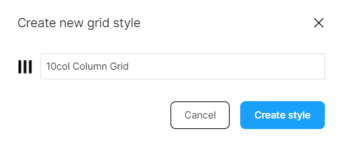
Next you will see the following. Type in the name and click the Create Style button.
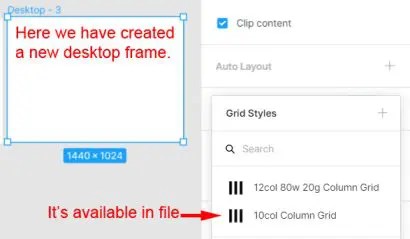
And then this. Now that grid style you just created is available in your current file. You can use it in your next frame.
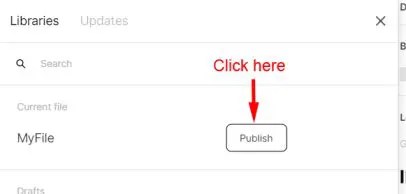
Making Styles Available All Over – Library
Do you want to be able to use this new grid style outside of your current file? First, be sure your file is renamed to something other than Untitled. Go over to Assets (on the left) and click on the little book icon. This is your Library. The screenshot below is only the top portion of the popup Library window, because that’s the relevant part for this discussion.
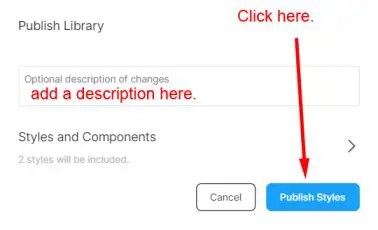
Add an optional description if you like.
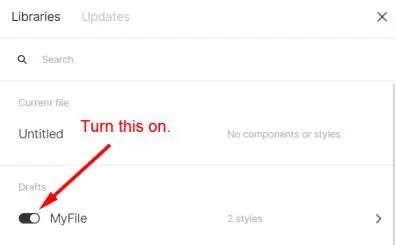
New File
Now go ahead and create a new file with the plus sign in the top row of Figma. Go to Assets. Click on the book icon. Yurn it on as shown in the screenshot below. Whenever you create a new file you will likely need to open the Library and turn on access to the styles. They are not available by default.
Now that new grid style you created is available in your new file. Create a frame and select the frame (if necessary). Click the 4 dots Style icon beside the Layout Grid in the right-side panel. You will see your grid style that was created in the other file. It’s available for use. Click it to add it.
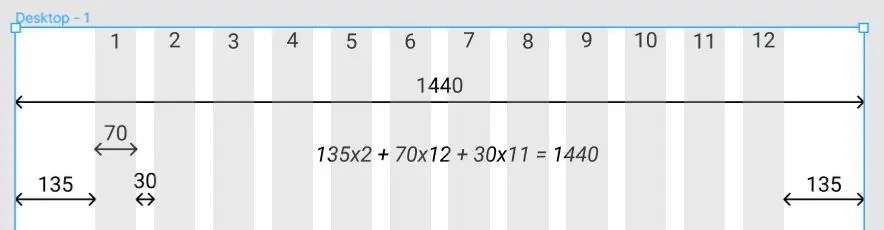
Bootstrap Columns
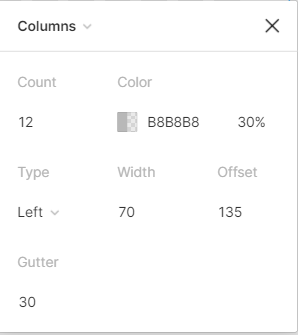
This is from the tutorial, except I changed the opacity to 30% instead of 50%.
Webflow Columns
Webflow also uses 12 columns. However the width is only 940 pixels wide. The width is 60 pixels and the gutter is 20 pixels and the offset is 0 pixels. (60 x 12) + (20 x 11) = 940. The standard width of a container in Webflow is 940 pixels. You first want to think about your blocks in webflow because when you get into Webflow, you start to work with sections.