This post follows from the previous post that was about preparing for deployment. Here we assume that you have a WPF solution that you have finished developing and are ready to use MSIX to finish creating an installer package. We have assumed that you have already created the installer project and an icon.
In Solution Explorer of Visual Studio, double click the Package.appxmanifest. There are six tabs at the top as follows:
- Application
- Visual Assets
- Capabilities
- Declarations
- Content URIs
- Packaging
If you’d like to watch a good instructional video on this In the Application section provide a Display name and a description. Set the Lock screen notifications to Badge and Tile Text. After doing those three things, you are finished with this section. Go to Visual Assets.
The Visual Assets section is next. Here is where we use the Asset Generator to take our graphic file and insert it as the Source to create all of the different needed sizes. You don’t have to do it this way if you already have different sizes developed. Click the square ellipses button to add the icon you created in the previous post. In the Assets section choose All Visual Assets. Choose the scaling mode that makes sense to you. Check “Apply recommended padding”. Check “Apply color conversion for Windows Light Theme”. Click the Generate button. Click Ok to the popup. There should be a ton of files in your Assets folder.
We can leave the Capabilities section alone. It’s for Universal Windows Platform (UWP). With WPF, we get full access to the computer by default. We will also leave Declarations alone. We’ll leave Content URIs alone because we are not doing anything with notifications.
In the Packaging section we can just leave the Package name alone and leave the GUID there. Provide a package display name. Provide a publisher display name. Since this is just a demo you could use your own personal name, otherwise you might use a company name.
The next part deals with code signing certificates. When you install an application with MSIX you must have a code signing certificate. If you plan to sell your application, you will want to use a certificate from a reputable authority. Certificates are not free, however, you can make free ones if you want, but they won’t be trusted. If you are just creating a program for use inside your company you can simply create one of those free ones (assuming company policy allows for this) and avoid having to pay the $100 per year for a trusted certificate. One such certificate authority is Comodo.
Click the Choose Certificate button. Click the Create button. Add a Publisher Common Name. If this is just a demo you can use your personal name, or whatever you want. The next step is to enter your password and confirm your password. Click the OK button. Note that it expires in one year. Click OK again. We now have an untrusted certificate.
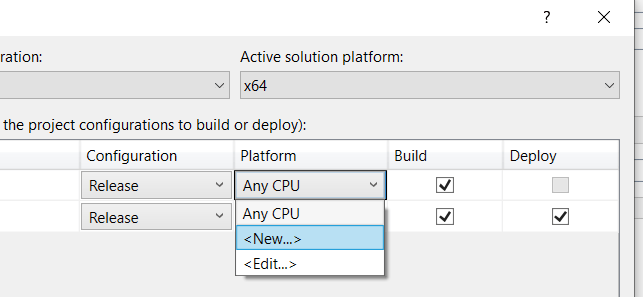
Configure the Build Platforms
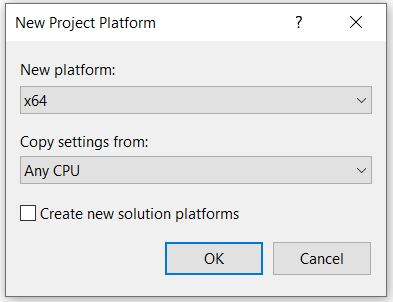
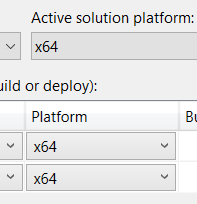
We are almost ready to begin the publishing process. I will follow along in the video starting at time 33 minutes. Tim’s video is on YouTube and it’s called MSIX Installer for Desktop Applications – Packaging WPF, WinForms, and UWP Applications. Go to the Build menu and then choose Configuration Manager. We need to set the x64 and x86 for the Release configuration. Don’t worry about the Build configuration. What you want to end up with is shown in the third screenshot below. You want all of the three to be the same (all are x64 in this example). The first two show you how to do it. For the second screenshot, ensure that you do not check the check box. Leave it unchecked. Click on the pictures to enlarge them.
Publish with Sideloading Method
Now we are ready to actually build the package. In Solution Explorer, right click your installer project and select Publish. You will get a window pop up that says Select Distribution Method. Select sideloading and check the box for updates. Click Next. Select “Yes, use the current certiificate”. Clcik Next. In the Select and configure packages window, uncheck Neutral and check x86 and x64. Make sure the x86 matches with the Release (x86) and the x64 matches with the Releaase (x64). Note that x86 is 32-bit and x64 is 64-bit. Click Next. Add an installer location (folder) if its not there.
Trusted Certificate
It will not install when you try to install it. Go to the folder location that you supplied in the last step. Double click the .appinstaller file or open the html file and click the Get the app button. You will see the following: “This app package is not signed with a trusted certificate…” How do we trust our app? Go ahead and open up the folder. You will see 2 files. You have a file with a .cer file extension. It’s the public certificate that is safe to give out. The .pfx file in our project in Solution Explorer is the private certificate that you never give out. So you would give the public certificate to someone that you also give the program to because you want them to be able to install it. To test this on our own computer system, right-click the .cer file and choose Install certificate. If you choose Local Machine, as I did, you get a UAC (User Account Control) dialog box pop up. It takes administrative rights to move on. The next thing that gets asked is where you want to install the certificate. Choose a specific location by clicking the second radio button. We want it to be a root certificate. From the list of Certificate Stores, choose Trusted Root Certificate Authorities. Click Ok. Click Next. Click Finish. At this point, we should have successfully installed the certificate that allows us to install our application on our own machine.
Installation
When I try to install it we get an error. We need to include another file. We are using SQLite. We need to include a .dll file to have access to our database. SQLite.Interop.dll is the file we need to ship with our application. How do we do that?
I don’t know, but here are some interesting points. When you’re starting to work with MSIX you will soon find out that MSIX files, like appx files, get installed to the folder C:\Program Files\WindowsApps. SQLite opens some temporary files alongside the database during its operations. That means the user also needs write-permissions on the database directory, otherwise, it doesn’t work. That may be the reason I get the error. The error is: Unable to open the database file.
One-Click
For now, let’s change direction and develop an install package another way, with One-Click. I could follow down the above installation path, but it would take more work. The One-click publish way is much easier.