In this post we will have our first example of data binding in Windows Presentation Foundation using XAML between a TextBox and a TextBlock. The TextBox is the element that the user can type text into and the TextBlock will display whatever the user types in.
Sources and Targets
- The source property can be any .NET property on any .NET object
- The target property must be a dependency property
- The source member must be a real and public property, not just a simple field
Here is a screenshot of a simple program illustrating binding in XAML.
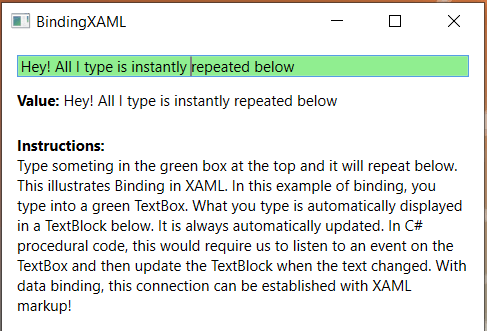
In the below screenshot you can see the important code. The two arrows show the direction of the data movement, from the green box to the text block. The code in general terms looks like this: {Binding Path=NameOfProperty}. However, since Path is the default property of a binding, you can leave it out like this: {Binding NameOfProperty}. A binding has many other properties though, one of them being the ElementName which we use in our example. This allows us to connect directly to another UI element as the source. Each property that we set in the binding is separated by a comma.

- Path is the Property
- ElementName is the Element
Here is the XAML code listing for this project.
<Window x:Class="BindingXAML.MainWindow"
        xmlns="http://schemas.microsoft.com/winfx/2006/xaml/presentation"
        xmlns:x="http://schemas.microsoft.com/winfx/2006/xaml"
        xmlns:d="http://schemas.microsoft.com/expression/blend/2008"
        xmlns:mc="http://schemas.openxmlformats.org/markup-compatibility/2006"
        xmlns:local="clr-namespace:BindingXAML"
        mc:Ignorable="d"
        WindowStartupLocation="CenterScreen"
        Title="BindingXAML" Height="270" Width="400" MinWidth="400" MinHeight="270">
    <StackPanel Margin="12">
        <TextBox Background="LightGreen" Text="Hey!" Name="txtBoxText" />
        <WrapPanel Margin="0,10">
            <TextBlock Text="Value: " FontWeight="Bold" />
            <TextBlock Text="{Binding Path=Text, ElementName=txtBoxText}" />
        </WrapPanel>
        <WrapPanel Margin="0,10">
            <TextBlock Text="Instructions: " FontWeight="Bold" />
            <TextBlock TextWrapping="Wrap" Text="Type someting in the green box at the top and it will repeat below. This illustrates Binding in XAML. In this example of binding, you type into a green TextBox. What you type is automatically displayed in a TextBlock below. It is always automatically updated. In C# procedural code, this would require us to listen to an event on the TextBox and then update the TextBlock when the text changed. With data binding, this connection can be established with XAML markup!" />
        </WrapPanel>
    </StackPanel>
</Window>
One Source, Two Targets, No Problem
You can have one source element (a TextBox in this case) and two targets (TextBlocks in this case). Just add the code for the second target as shown below. Both targets update automatically.
    <StackPanel Margin="12">
        <TextBox Background="LightGreen" Text="Hey!" Name="txtBoxText" />
        <WrapPanel Margin="0,10">
            <TextBlock Text="Value: " FontWeight="Bold" />
            <TextBlock Text="{Binding Path=Text, ElementName=txtBoxText}" />
        </WrapPanel>
        <WrapPanel>
            <TextBlock Text="Value: " FontWeight="Bold" />
            <TextBlock Text="{Binding Path=Text, ElementName=txtBoxText}" />
        </WrapPanel>
        <WrapPanel Margin="0,10">
            <TextBlock Text="Instructions: " FontWeight="Bold" />
            <TextBlock TextWrapping="Wrap"
                       Text="Type someting in the green box at the top and it will repeat below, twice!"/>
        </WrapPanel>
    </StackPanel>
