- SQL Server CLR Assemblies
- SQL Server CLR Assemblies Part 2
CLR stands for Common Language Runtime. This blog post is about writing SQL Server stored procedures and functions in a language other than T-SQL.
Previously, we had a post on something different but similar to this post. It discussed how to call an existing stored procedure in SQL Server from within a running C# program. In this case you need to get a connection to the SQL Server and make the call. In the example here, we are going to use Visual Studio to write a short C# program that we can put right into SQL Server as an Assembly.
| Database | CLR Version |
|---|---|
| SQL Server 2005 | 2.0, 3.0 or 3.5 |
| SQL Server 2008 | 2.0, 3.0 or 3.5 |
| SQL Server 2012 | 2.0, 3.0, 3.5 or 4.0 |
-- a server setting that applies to all databases
sp_configure 'clr enabled', 1
go
RECONFIGURE
go

Once we Execute this code in SQL Server we can now add assemblies. This ability will remain for this instance of SQL Server even after you restart the server. To turn it off you will need to run similar code to turn it off.
An assembly is any DLL written in any of the .NET languages. There are many .NET languages you could use. Here’s a list that I have not verified, but at least note that it is lengthy. These are: APL, C++, C#, Cobol, Component Pascal, Curriculum, Eiffel, Forth, Fortran, Haskell, Java Language, Microsoft JScript, Mercury, Mondrian, Oberon, Oz, Pascal, Perl, Python, RPG, Scheme, Small Talk, Standard ML and Microsoft Visual Basic.
How do you add your assembly to SQL Server? Right-click on Assemblies, click New Assembly.. and Browse out to where you DLL file is located. Select it. Click OK. That’s easy.
Part of this post is based on a lynda.com video called SQL Server: Triggers, Stored Procedures and Functions. Section 7 is called Using CLR Assemblies. This course includes a “hello world” assembly for download.
Now we want to create a stored procedure that calls our assembly. The code for doing that is shown below. After the key word EXTERNAL is name. After that is the name of the assembly which is what you see there under Assemblies: “helloworld”. After the dot is the name of the class that’s in the assembly (we’d need to get this information from documentation) and the third part is the name of the method in the class. assembly.class.method.
CREATE PROC testCLR
AS
EXTERNAL name helloworld.HelloWorldProc.HelloWorld
Once the stored procedure is created you can run it with EXEC testCLR in a new query window. What you will see is the message Hello world! in the Results window.
Writing Our Own DLL in C#
You will need Microsoft Visual Studio to do this project. Visual Studio Community 2015 is a free download. In Visual Studio you will start by creating a new project.
New Project, Visual C#, Class Library (A project for creating a C# class library (.dll)), and give it a name. Give the project the name CLRtest. In the Location input box at the bottom of the dialog box, navigate to the folder that you want your project to be stored in. Click OK.
Rather than use the default class that Visual Studio provides, we will create a new class.
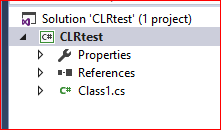
At the left is a screen shot of the Solution Explorer in Visual Studio. It shows the solution as CLRtest. There is also a project called CLRTest. There is a class already. We will create our own class, however. Right click the project (CLRTest), Add, Class, and name it at the bottom with the name mSprocs.
Have a look at the small piece of code below. Remove it from your code. We don’t need it.
namespace CLRtest
{
    class mySprocs {}
}
Add code until you get the following.
using System;
using System.Collections.Generic;
using System.Linq;
using System.Text;
using System.Threading.Tasks;

using System.Data;
using System.Data.SqlClient;
using System.Data.SqlTypes;
using Microsoft.SqlServer.Server;

public class mSprocs
{
    [Microsoft.SqlServer.Server.SqlFunction]
    public static void InsertAuthor()
    {
        using (SqlConnection conn = new SqlConnection("context connection=true"))
        {
            SqlCommand comm = new SqlCommand();
            comm.CommandText = "INSERT INTO AUTHORS (FirstName, LastName) VALUES ('Sally', 'Smith')";

            comm.Connection = conn;

            conn.Open();
            comm.ExecuteNonQuery(); /* NonQuery because we do not expect anything to be returned  */
            conn.Close();
        }
    }
}
In SQL Server, open a new query and run the code below.
CREATE PROC InsertAuthor
AS
EXTERNAL NAME CLRtest.mySprocs.InsertAuthor
We can name the procedure anything we want in the above code but it makes sense to use InsertAuthor. The name is after the word PROC.
If you are working in a database that does not have an [Authors] table with the two columns FirstName and LastName then you will need to create the table before you test your Assembly.