What is OneNote 2016? OneNote 2016 is an application that comes with Office. You get a different version of OneNote with Windows 10 called OneNote. This post is however covering OneNote 2016. The information in this post is sources from the OneNote 2016 Help and a free Udemy.com course called Learn Microsoft OneNote 2016 the Easy Way by the company called Simon Sez IT.
If you’re using OneNote on a computer or device running Windows 10, you may have seen two similar-looking OneNote app icons on your Windows Start menu. OneNote for Windows 10 (simply labeled “OneNote”) is pre-installed with Windows 10. This version runs only on Windows 10 and it’s the newest, most up-to-date and feature-rich version of OneNote on Windows. OneNote 2016 (commonly referred to as the “desktop app”) comes with Microsoft Office and runs on Windows 10, Windows 8, and Windows 7. This version looks similar to the other Office 2016 apps like Word, Excel, and PowerPoint. The OneNote 2016 desktop app is also available as a free download from www.onenote.com.

OneNote uses familiar terminology when it describes the hierarchy of the objects you work with. At the top level are the notebooks. These can be many. You may have a notebook for school, work and personal life for example. The picture shows an example of a school notebook. Notebooks have as many sections as you like. Within each section you can have as many pages as you like. Page titles appear on the right side of OneNote. The large white work surface in the middle of the application is a page.
You can add content to pages. The simplest content to add is text. Place you cursor on the page and just start typing. The interesting thing is that OneNote automatically creates a container for the text. The container appears as a box around the text that you may drag and drop to move it around on the surface of the page if you wish.
OneNote 2016 GUI
When you start the program you will something similar to the screen shot below, if you re-size the entire program and have a look at the upper left corner.
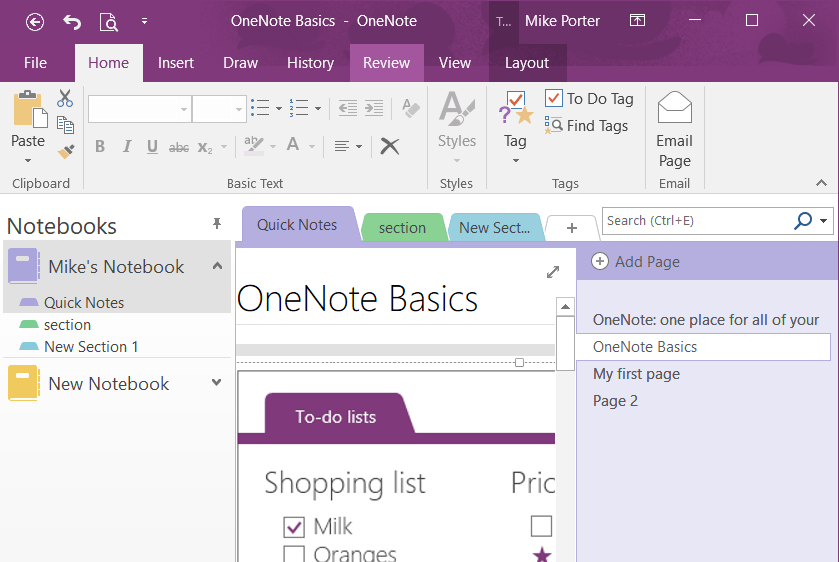
At the extreme top left is the Quick Access Toolbar which has the small icons for Back, Undo, Print Preview and Customize Quick Access Toolbar.
Creating Notebooks
When you use OneNote you will be working with Notebooks. You can create as many as you like and delete them aas well. You can close them without deleting them, which simply removes them from the main Workspace (program interface) on the left hand side. You can name them as you like, locate them where you want and give them a background colour that you want. You can also share them with others.
It looks like I only have two notebooks. There is a third notebook called Wildlife. To open that one, I would go to the menu File, Open and browse for it if I didn’t see it in the list.
The contents of a notebook are arranged in Sections. These sections are shown as tabs horizontally across the screen. In the above screen shot the three sections of Mike’s Notebook are Quick Notes, section and New Section 1. The Quick Notes section has three pages which you access on the right. In this case they are OneNote Basics, My first page and Page 2. The main work area is the largest area in the middle of the screen.