- DBeaver Database
- SQLite ERD with DBeaver
- DBeaver Full SQL Dump
How to Create and Save an ERD for a SQLite Database Using DBeaver (2025 Guide)
Plesae see the warning at the bottom of this blog.
If you work with SQLite, creating an Entity Relationship Diagram (ERD) is one of the most effective ways to understand your database structure. An ERD helps you visualize all your tables, see how they relate, spot design issues early, and keep a printable reference beside you while programming.
DBeaver includes a powerful ERD generator, but the real challenge is learning how to save the diagram so you can reopen and edit it later. This guide shows the full process using the updated (2025) DBeaver interface.
Step 1 — Connect DBeaver to Your SQLite Database
- Open DBeaver
- Click Database → New Database Connection
- Select SQLite
- Click Browse and choose your .db file
- Click Finish
Your database will now appear in the Database Navigator panel. The Database Navigator is the left-hand sidebar in DBeaver that displays all of your database connections, their tables, views, indexes, and other objects in a tree-style structure. It is the main place where you browse, explore, and interact with your databases.
Step 2 — Create an ERD (Updated 2025 Wizard-Based Workflow)
DBeaver now uses a wizard-based approach to generate ERDs.
- Right-click your SQLite connection in the Database Navigator
- Select Create → Other…
- Search for ER Diagram or navigate to DBeaver → ER Diagram
- Click Next
- Select your connection and click Next
- Choose the tables you want to include
Tip: For a clean ERD, select tables only. Avoid including Views unless absolutely necessary. They often clutter the diagram and rarely add structural clarity.
Give your diagram a name and click Finish.
Step 3 — Arrange Your Diagram
When the ERD appears, it may initially look crowded or disorganized. You can refine it by:
- Dragging tables into the positions you want
- Zooming with your mouse wheel
- Panning by holding the middle mouse button
- Using auto-layout with Ctrl + L
- Using compact layout with Ctrl + Shift + L
Take your time to set up a layout that makes sense to you — and then save it so you never need to redo it.
Step 4 — Save the ERD as an Editable File (Not a PNG)
This is the most important step. To save your ERD in a way that you can reopen and edit later, do not export it as an image.
Instead, save the actual editable diagram file:
- Click File → Save As…
- Choose a folder (such as Documents/ERD_Diagrams)
- Name your file
- Save it using DBeaver’s native format: .erd
The .erd file preserves table positions, relationships, colors, notes, zoom level, and all layout adjustments.
It is your editable, working diagram file — not a static image.
Step 5 — Reopen Your ERD Later (Fully Editable)
You can close DBeaver at any time and later reopen your editable ERD:
- Open DBeaver
- Click File → Open…
- Select your .erd file
Your diagram will reappear exactly as you left it — fully editable and arranged.
Bonus: Windows typically associates .erd files with DBeaver, so you can simply double-click the file in File Explorer to reopen your diagram instantly.
Step 6 — Export a PNG, SVG, or PDF for Printing
Once your layout is finalized (or whenever you need a static image), export your ERD:
- Open the ERD
- Click File → Export Diagram
- Choose a format:
- PNG — great for documentation
- PDF — ideal for printing
- SVG — crisp, scalable, excellent for web use
Exported images are not editable, but they are perfect for reports, presentations, and reference sheets.
Summary
- Create: Right-click DB → Create → Other → ER Diagram → Select Tables → Finish
- Save (editable): File → Save As → .erd
- Reopen: File → Open → select your ERD file
- Export (image): File → Export Diagram → PNG, PDF, or SVG
- Tip: Include tables only (skip Views) for the cleanest diagram
With this workflow, you can maintain a clean, editable, and printable map of your SQLite database — a powerful tool for development, learning, and documentation.
Warning: Saving You ERD
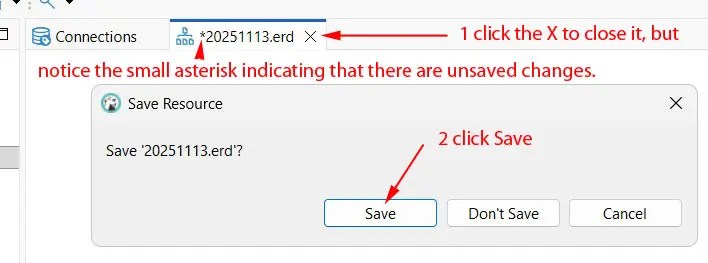
Important: Saving ERDs in DBeaver can be unintuitive. When you use File → Save As to create your .erd file, DBeaver still keeps an internal “unsaved” session open. If you later close the ERD tab and choose No when asked “Do you want to save changes?”, DBeaver will discard the updates you made since the last save. Always choose Yes when closing the ERD tab to ensure that your latest layout is written back to the file.
As someone who has used computers since the IBM XT days — the era of dual 5.25-inch floppy drives and no hard disk at all, I can say without hesitation: DBeaver’s ERD “Save vs. Close” behavior is the single worst UX trap I’ve ever seen, but I do appreciate the fact that DBeaver is available without charge and remains a powerful and recommended tool overall.
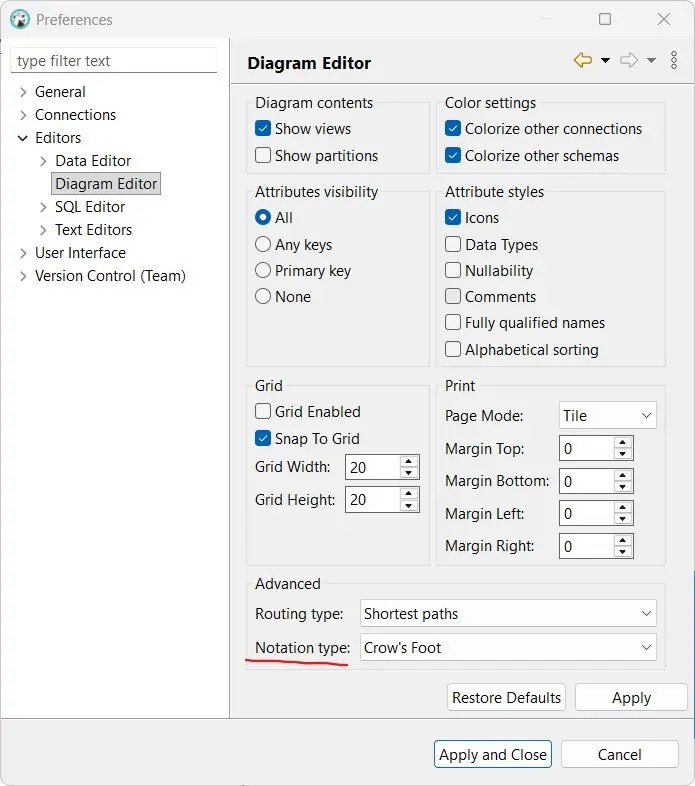
Go to Window, Preferences. I recommend having a look at the preferences and making any changes you like. I like the Crow’s foot rather than IDFF1X style.